
对于双网卡的centos8系统,在系统安装后再添加的网卡,需要手动配置网卡信息。
双网卡的系统应用,主要包括将一个网卡设置为外网,一个网卡设置为内网,并设置成DHCP服务器。将内网设备通过内网网卡连接,内网网卡NAT到外网网卡上网。
本文主要实现的技术包括:添加网卡,静态IP设置,DHCP,NAT上网,IPTABLES设置,PVE多vps的网口虚拟联网
在不需要单独配置网卡的驱动的情况下,网卡的配置主要包含以下部分:
- 检查网络
ifconfig
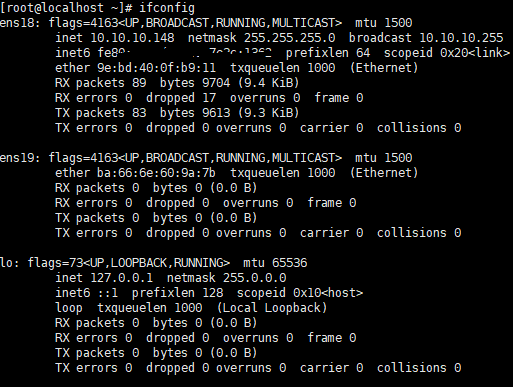
- 添加网卡配置文件(ens19为内网网卡,ens18为外网网卡系统默认)
uuidgen ens19 #生成ens19的UUID
cd /etc/sysconfig/network-scripts/
cp ifcfg-ens18 ifcfg-ens19
nano ifcfg-ens19
- 设置为静态IP,修改如下:
TYPE="Ethernet"
PROXY_METHOD="none"
BROWSER_ONLY="no"
#BOOTPROTO="dhcp"
BOOTPROTO="static"
IPADDR="192.168.0.1"
GATEWAY="192.168.1.1"  #内网设备需要指定外网的网关,不指定本机就是网关
NETMASK="255.255.255.0"
DNS1="114.114.114.114"
#DEFROUTE="yes"
IPV4_FAILURE_FATAL="no"
IPV6INIT="yes"
IPV6_AUTOCONF="yes"
IPV6_DEFROUTE="yes"
IPV6_FAILURE_FATAL="no"
IPV6_ADDR_GEN_MODE="stable-privacy"
NAME="ens19"
UUID="c98f8d72-2cb1-48fa-90aa-b24c603d096e"
DEVICE="ens19"
ONBOOT="yes"
- 配置后重启,最终效果:

- 安装dhcp服务器
yum install dhcp-server
ip add sh dev ens19 #绑定网卡
#cp /usr/share/doc/dhcp-server/dhcpd.conf.example /etc/dhcp/dhcpd.conf
nano /etc/dhcp/dhcpd.conf
修改如下
# DHCP Server Configuration file.
# see /usr/share/doc/dhcp-server/dhcpd.conf.example
# see dhcpd.conf(5) man page
#
######################################################
#Define the domain name of your DHCP server
option domain-name "PVE2020";
# Define the IP address or Hostname of your DNS server
#option domain-name-servers ns1.kifarunix-demo.com;
#If you have multiple DNS servers, specify them as;
# option domain-name-servers ns1.kifarunix-demo.com, ns2.kifarunix-demo.com;
# Define how long should an endpoint use the assigned IP address
default-lease-time 3600; # One hour
# Define the maximum lease time
max-lease-time 7200; # Two hours
# Other values you can use are 86400 (one day), 604800 (one week) and 2592000 (30 days).
#
# Declare the DHCP server official for the local network
authoritative;# Change the default log file for DHCP server.
log-facility local7;
#### Subnet Declaration ####
# The subnet declaration includes a range of IP addresses that a DHCP server can assign to clients.
# and global options to apply for every DHCP client.
#
# Define the subnet of the DHCP server interface (Network address and subnet mask)
subnet 192.168.0.0 netmask 255.255.255.0 {
# Define the broadcast address
option broadcast-address 192.168.0.255;
# Define the gateway
option routers 192.168.0.1;
option domain-name-servers 1.1.1.1;
# Define the range of IP addresses to be leased
range 192.168.0.2 192.168.0.120;
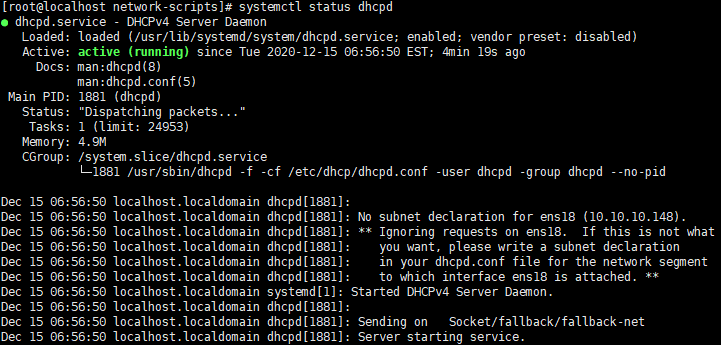
}启动dhcpd
systemctl enable --now dhcpd
systemctl status dhcpd #检查状态
- 开启NAT(实现内网网卡通过外网网卡上网)
本设置单次有效,系统重启即失效
nano /etc/sysctl.conf
添加如下内容:
net.ipv4.ip_forward=1
设置生效:
sysctl -p
- 开启NAT+IP伪装
由于centos8默认没有安装iptables,因此需要手动安装
yum -y install iptables-services
单次启动测试
iptables -F
iptables -P INPUT ACCEPT
iptables -P FORWARD ACCEPT
iptables -t nat -A POSTROUTING -o ens18 -j MASQUERADE  #ens18是可以上外网的网卡
检查路由表
route -n

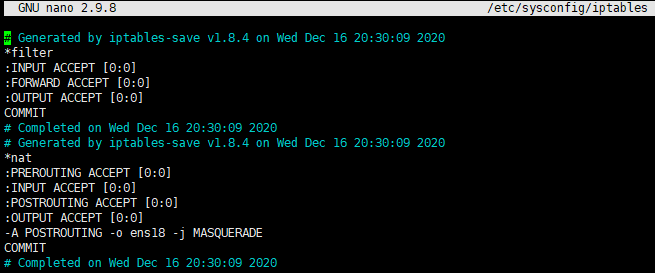
保存规则
service iptables save
systemctl restart iptables
查看配置文件
nano /etc/sysconfig/iptables
开机启动
systemctl restart iptables
systemctl status iptables
systemctl enable iptables
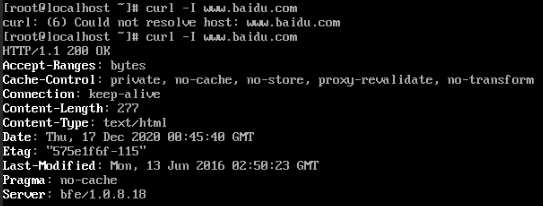
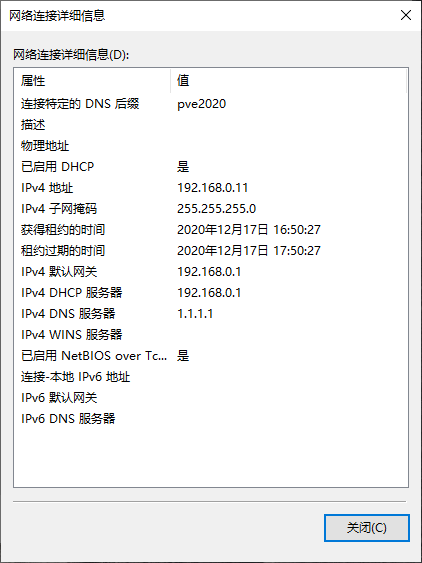
- 客户端检查
DHCP获取IP
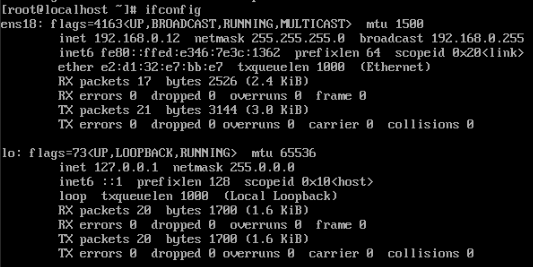
联网测试
win10联网测试
- 小结:
最终实现centos8作为路由器的功能:其中包括自动获取外部ip实现上网,内网网口的添加和静态IP设置,内网的DHCP服务器功能,并将内网设备通过NAT方式实现上网的功能。
- 补充问题——扩容
以上设置对于两个网卡的实现没有问题,但是对于内网有多个设备需要联网的情况,实际上又不相同。可能的解决措施包括以下方式:
1)采用交换机进行扩充,实现一个一个网口的多个DHCP的分配,网段在同一个网段,最多容纳的设备254个
2)采用多个网卡的方式进行处理,限于网卡数量的限制,一般适合6个设备的有线联网,在dhcp前需要将多个网卡组成网桥,再dhcp,或者在每个网卡上单独的设置dhcp的网段,再用vlan实现内部的导通(在OPNsense防火墙简介和安装和pfsense简介和安装过程可证明)
3)将以上两种方式组合,实现254*6个设备的联网,但是本身的意义不大,毕竟出口的带宽就这么大。
参考资料:
- https://my.oschina.net/u/4357584/blog/3345662
- https://www.cnblogs.com/lilto/p/11876682.html
- http://blog.it780.com/?p=88
- https://www.helplib.cn/%E6%9C%88%E6%9C%88/install-and-setup-dhcp-server-on-centos-8
- https://www.linuxprobe.com/chapter-14.html
- https://www.cnblogs.com/starshine-zhp/p/12013961.html
- https://blog.csdn.net/yu132563/article/details/78926259